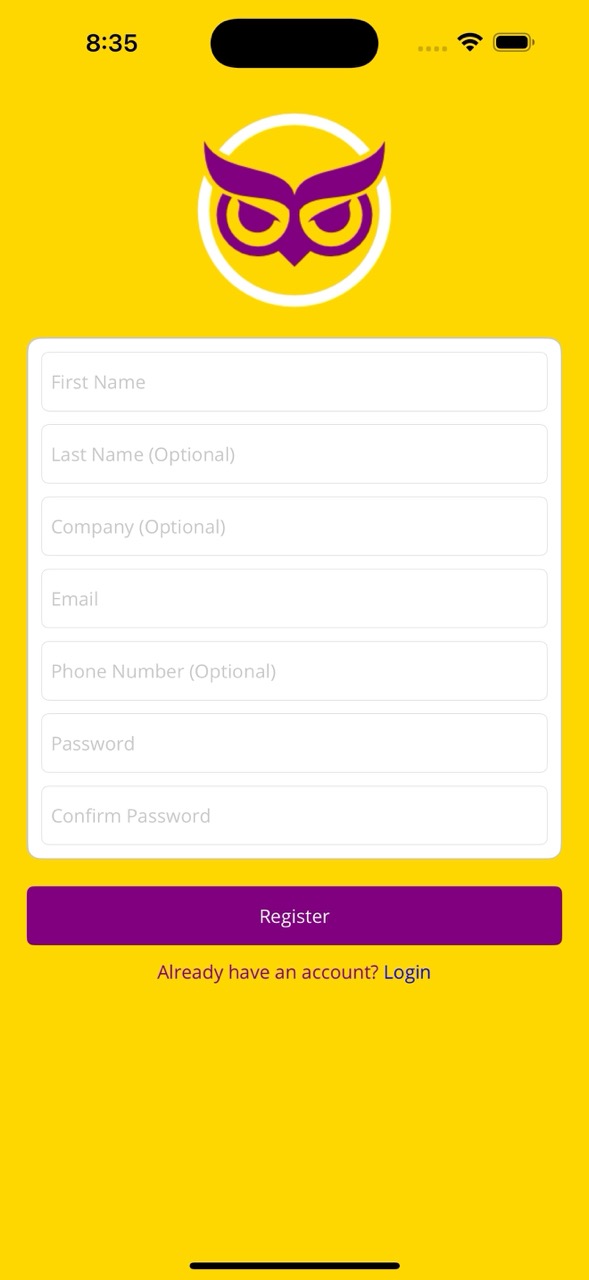
Create Your Account
After filling out the form, you will receive a confirmation email. You must click the verification link to activate your account. Until then, you will not be able to log in and will receive an error message asking to confirm your email address.
- First Name: Enter your given name.
- Last Name: Optional.
- Company: Optional. Useful for business accounts.
- Email: Used for login and account recovery.
- Phone Number: Optional, for contact purposes.
- Password: Choose a secure password.
- Confirm Password: Must match your chosen password.
Already have an account? Click Login
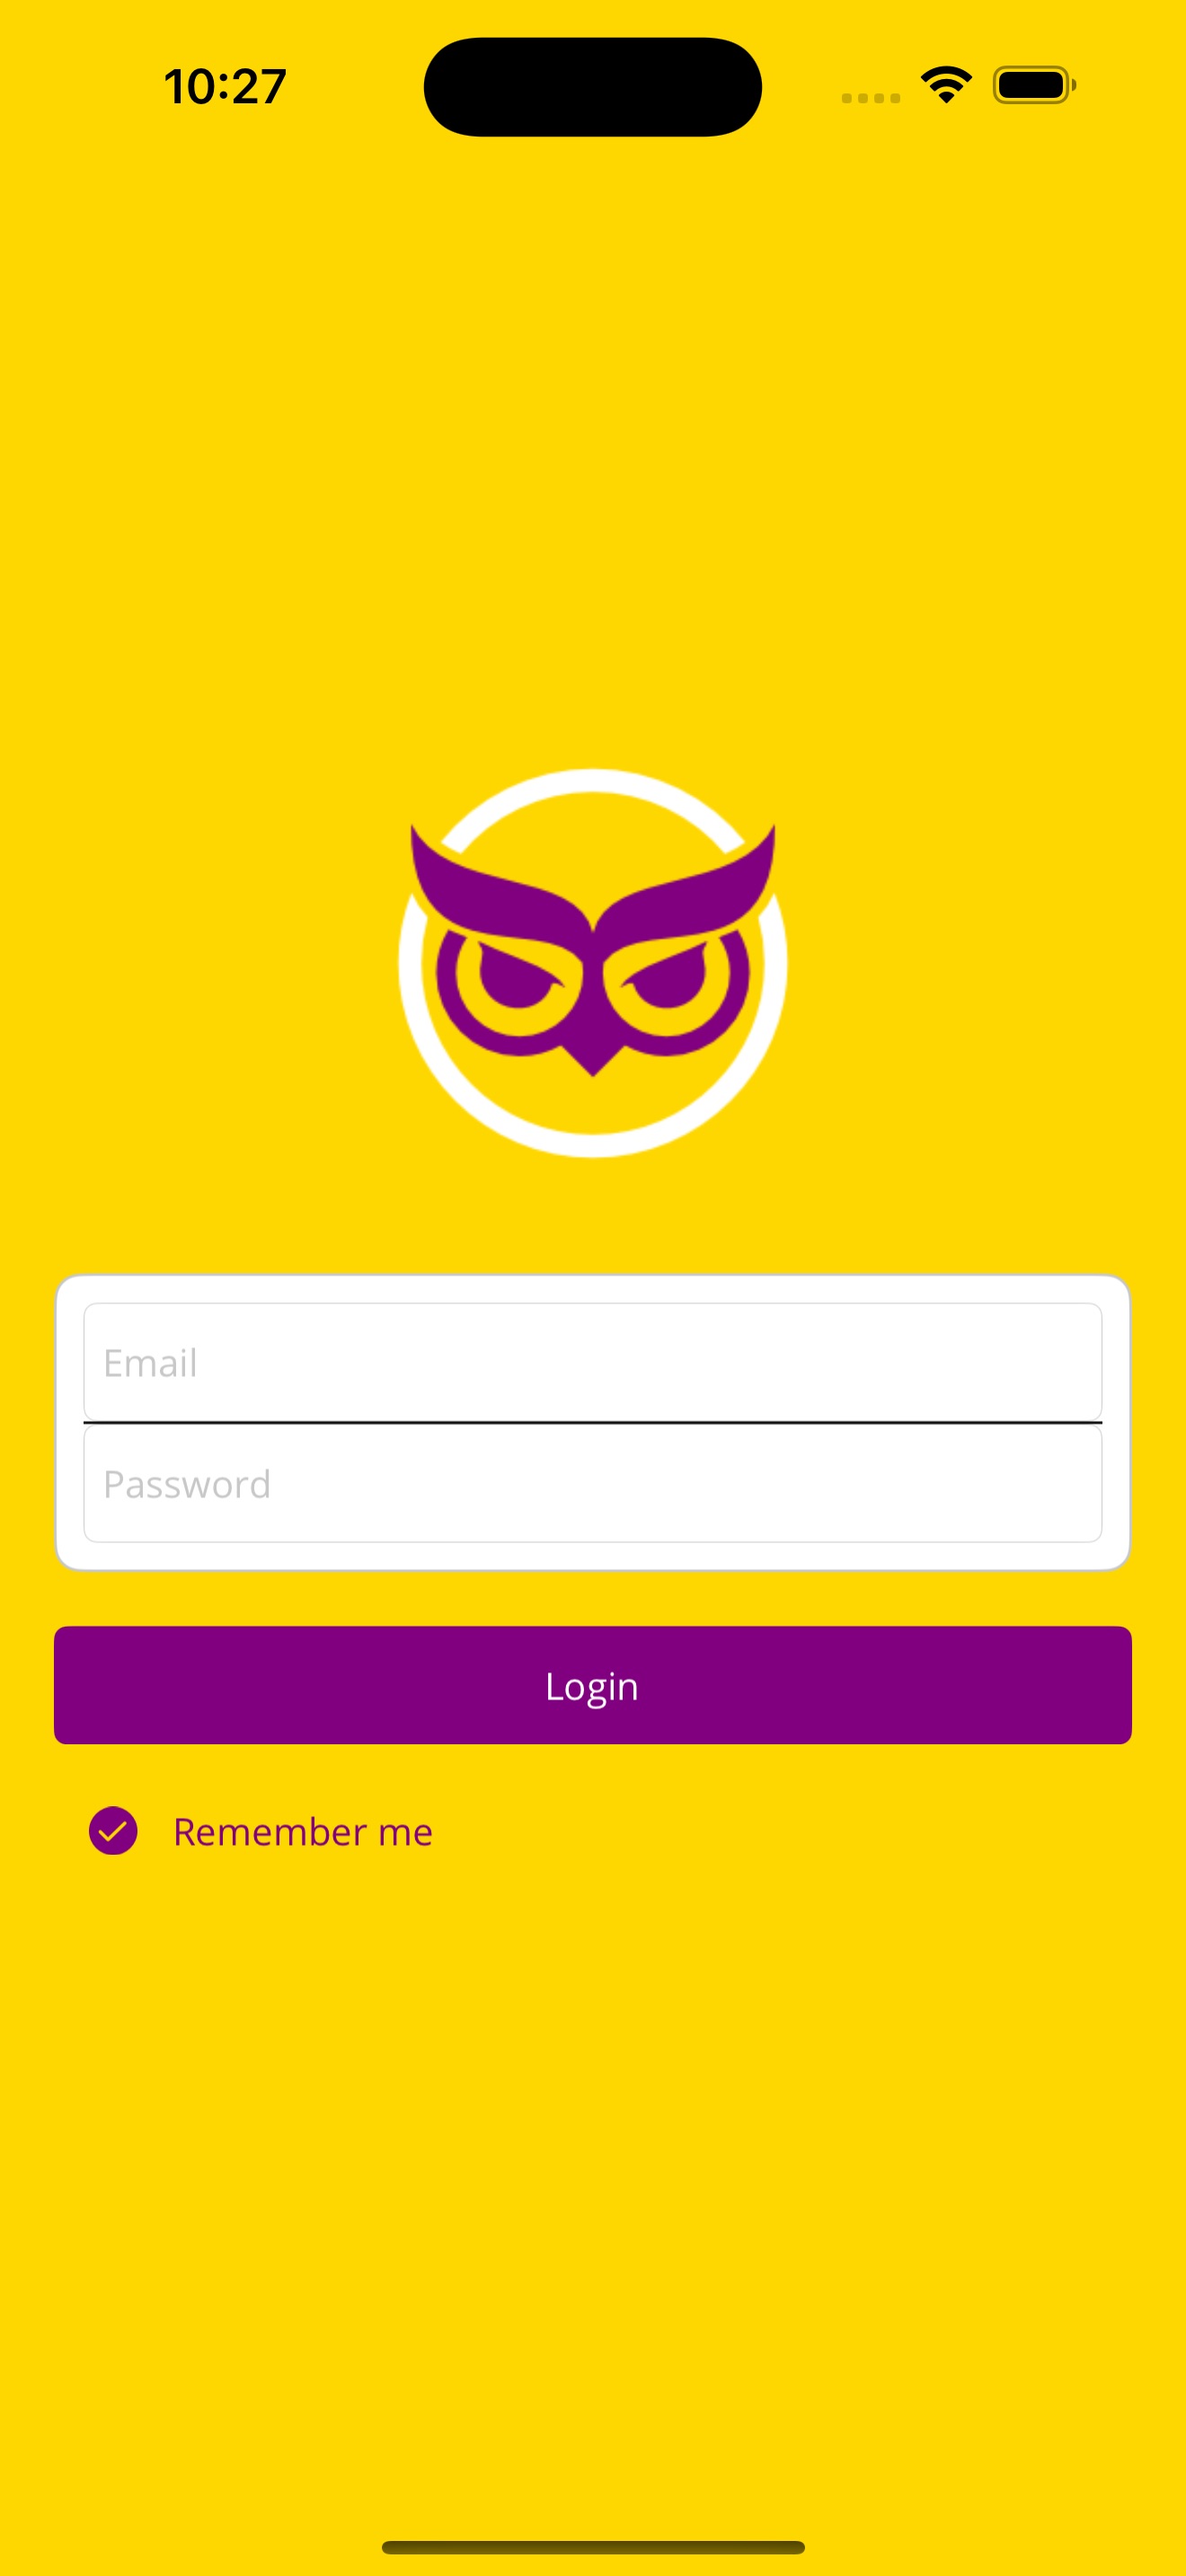
Login / Access
Use the email and password you registered with to access InvoiceCrafty. If you enabled "Remember me", your session will be kept active on your device for quicker access next time.
- Email: Enter the email address you registered with.
- Password: Enter your chosen password.
- Remember Me: If checked, you won’t need to log in again next time from the same device.
Don't have an account yet? Create one here.
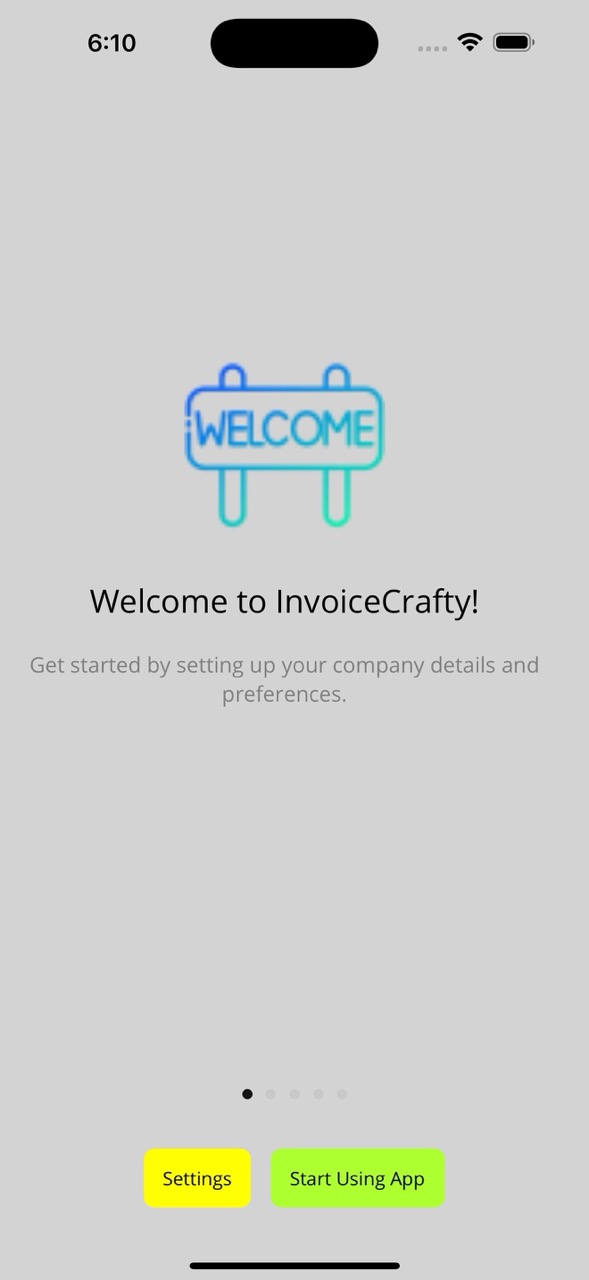
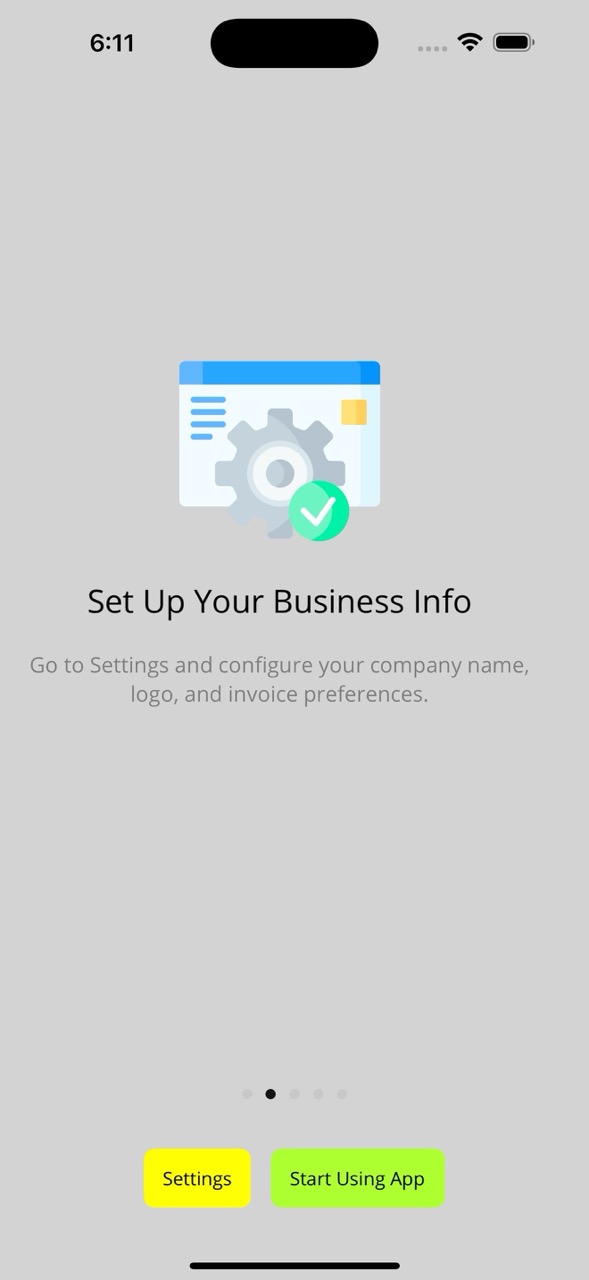
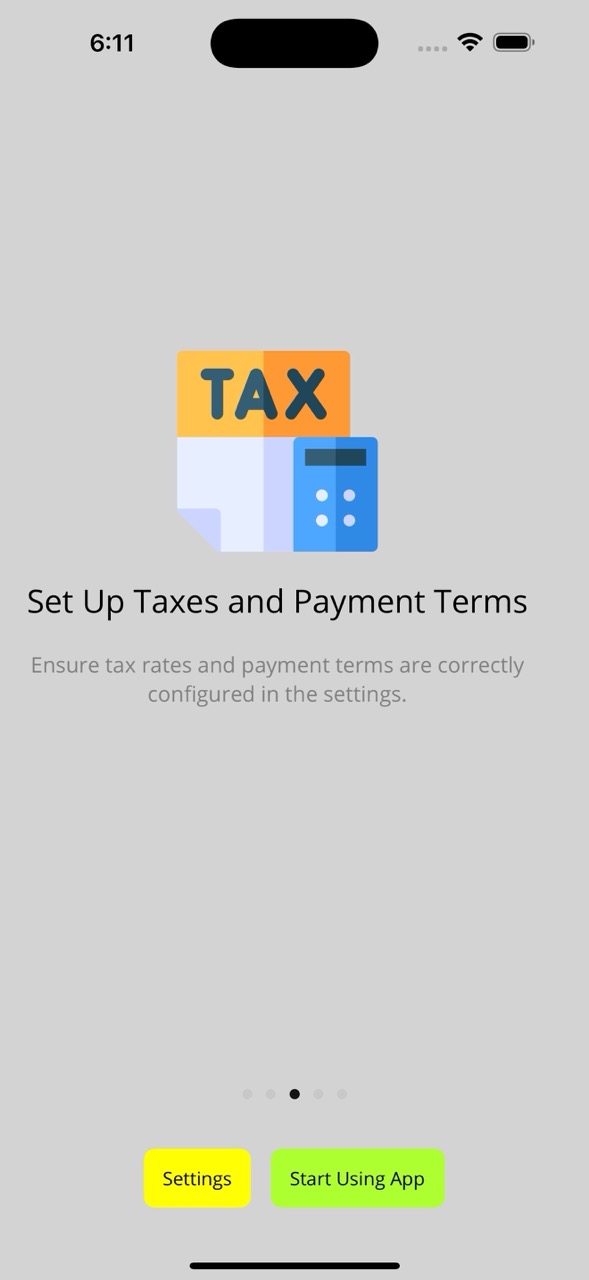
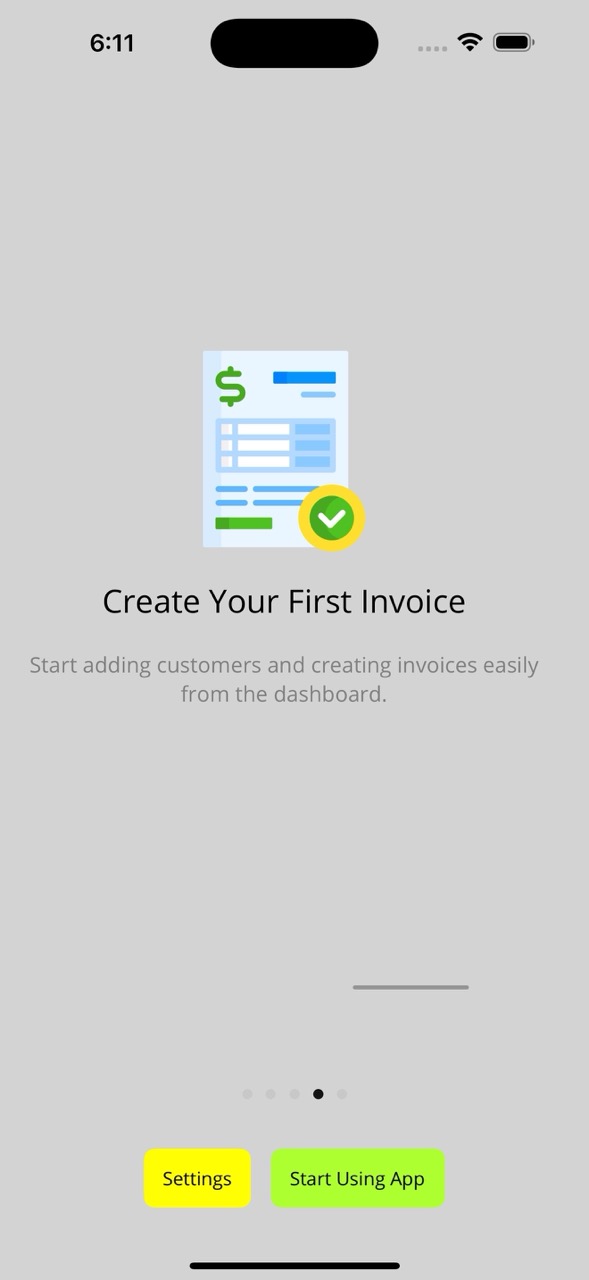
Intro Slider
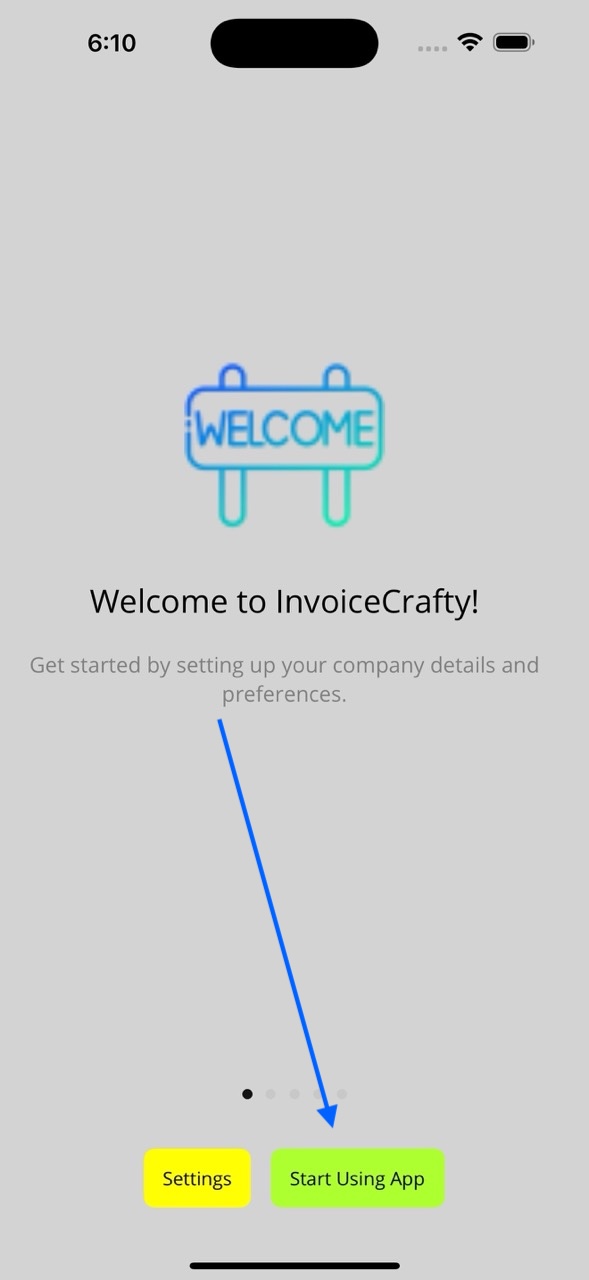
The first time you log in, you will see a welcome slider that introduces key features of the app. This helps you understand how to set up and use InvoiceCrafty effectively. We recommend going to Settings first to configure your company information before proceeding.
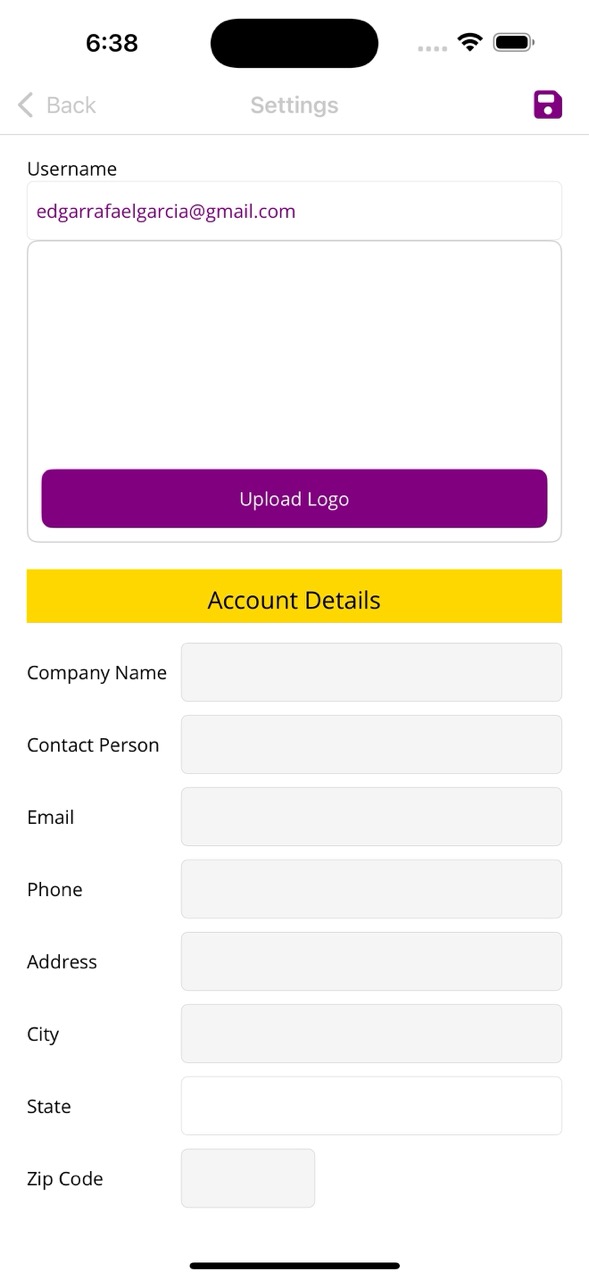
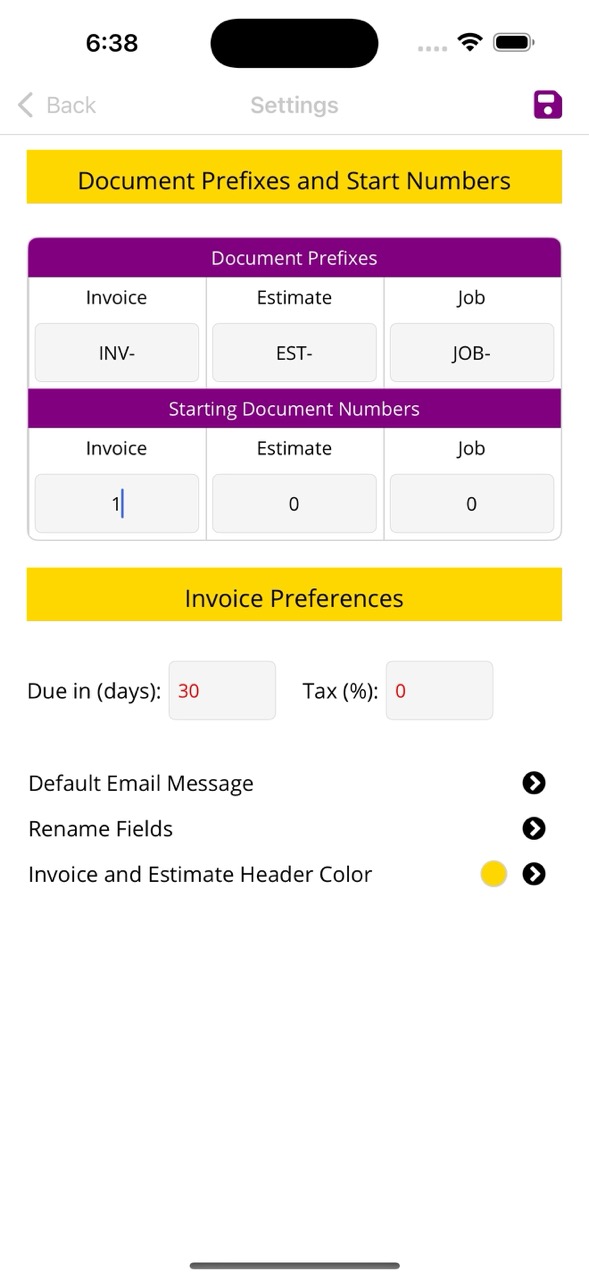
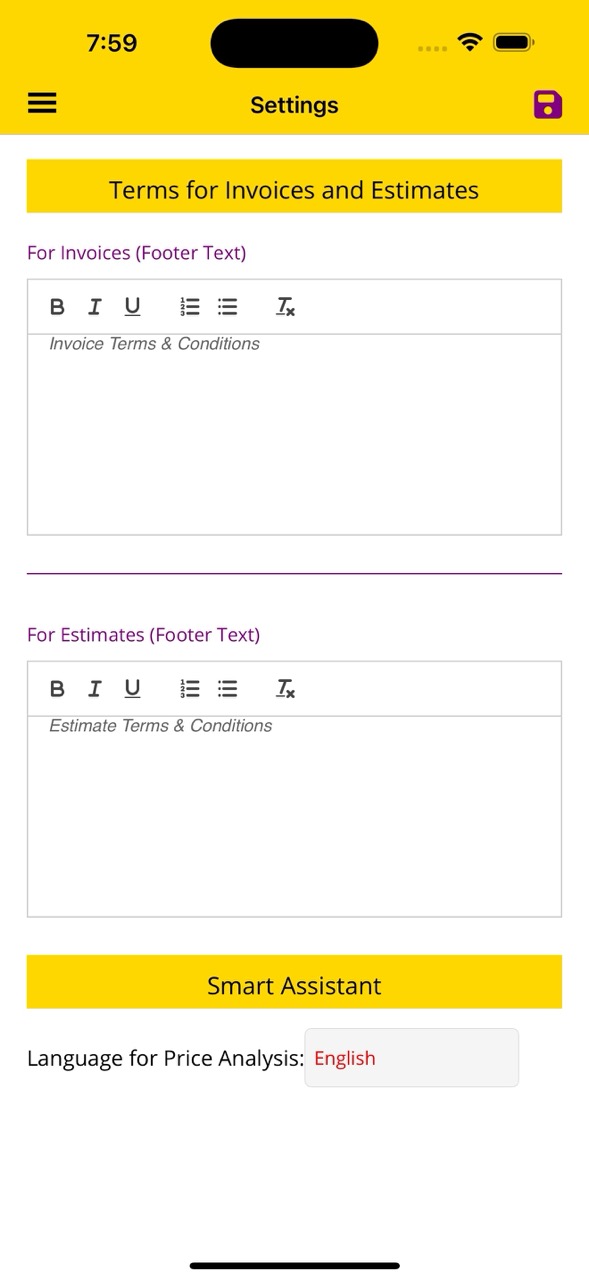
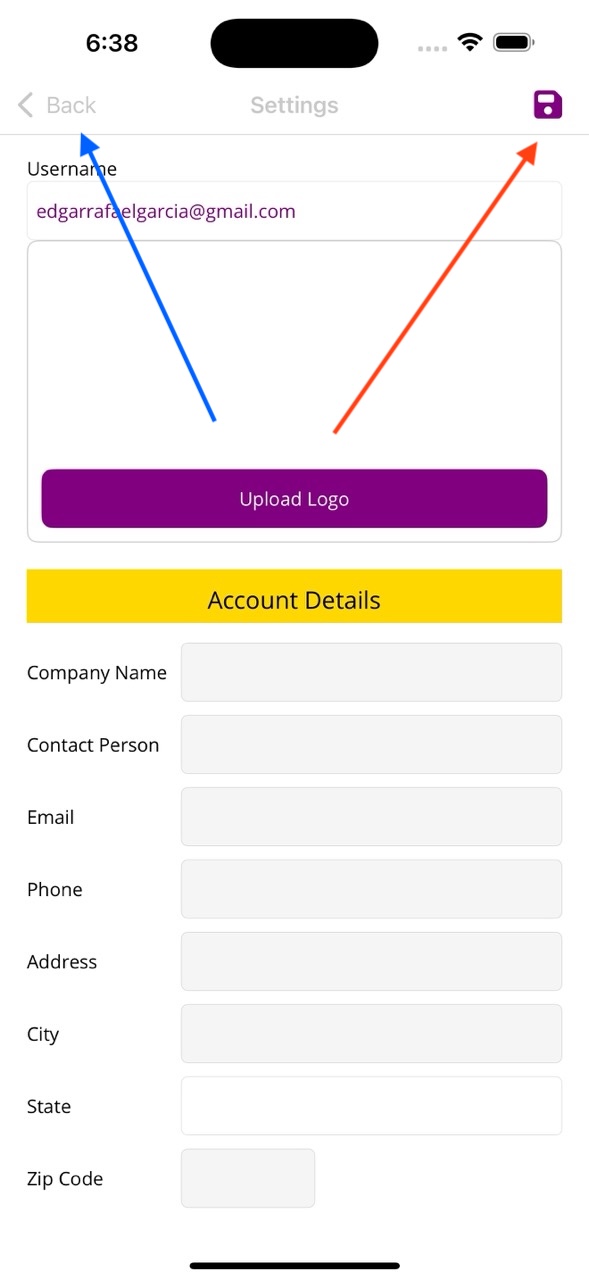
Settings
The Settings screen allows you to fully personalize InvoiceCrafty. Below is a visual tour of each section with detailed explanations. Please remember to save your changes by tapping the floppy disk icon located at the top right of each page.

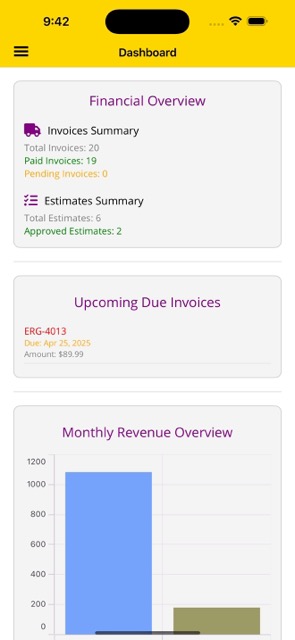
Dashboard Overview
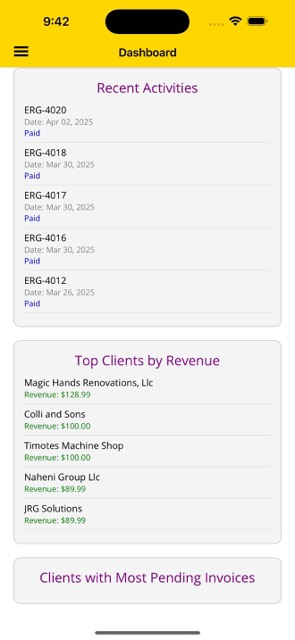
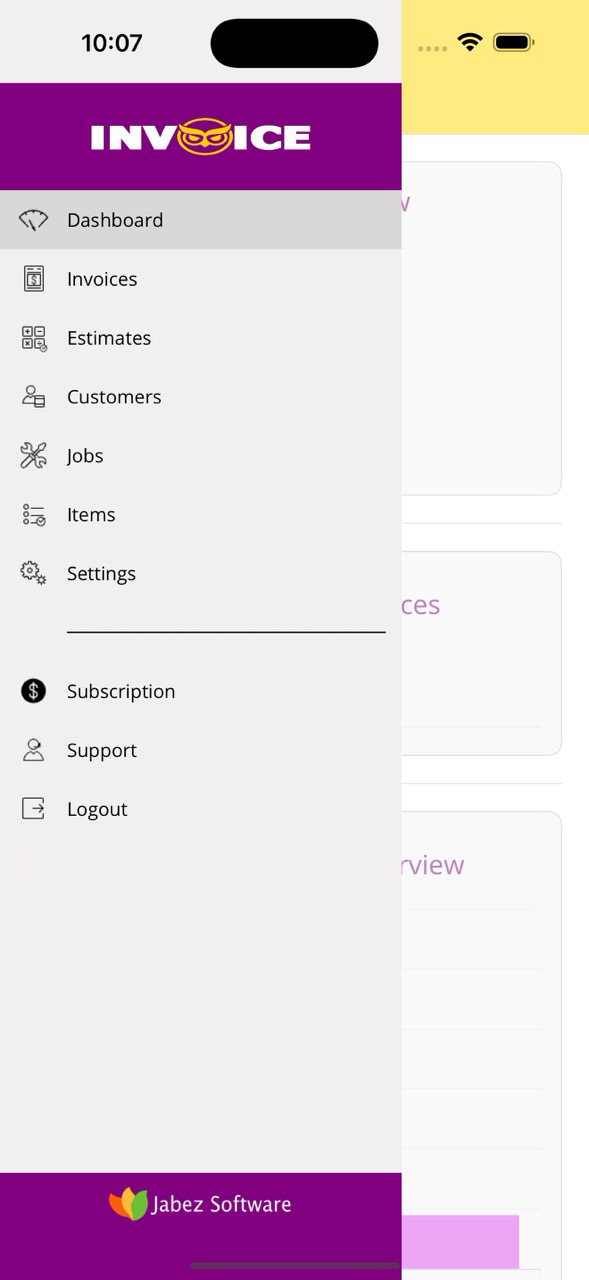
Navigation Menu
- Dashboard: View financial overview, due invoices, and top clients.
- Invoices: Manage your invoices quickly and easily.
- Estimates: Create and track estimates sent to clients.
- Customers: Your complete list of clients.
- Jobs: Track job orders related to your invoices.
- Items: Manage services or products you offer.
- Settings: Company details, logo, email and more.
- Subscription: View and manage your Premium plan.
- Support: Help center and contact options.
- Logout: Securely exit your session.
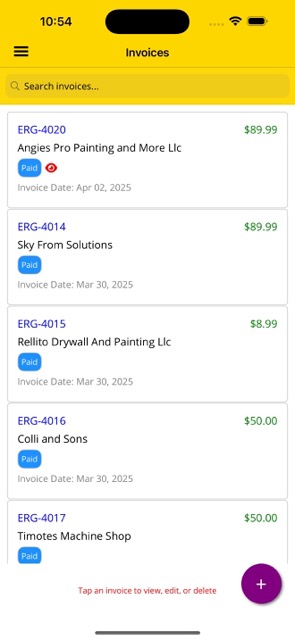
Invoices
In this section, you'll find a list of previously created invoices. Each card shows the invoice number, client name, amount, and issue date. You’ll also see a badge that indicates the current status of the invoice:
Paid = Already paid
Draft = Not yet sent
Sent = Sent to the client
Beside each badge, a red eye icon may appear, letting you know that the customer has already opened or read the invoice. At the bottom right corner, you will find a + button to easily create a new invoice.
- Status Badge: Each invoice shows a badge indicating its current status: Draft, Sent, or Paid.
- Eye Icon: A small red eye appears next to the badge to show that the invoice has been opened by the client.
- Invoice Details: Each entry includes the invoice number, customer name, invoice date, and total amount.
- New Invoice Button: A purple button at the bottom right allows you to create a new invoice.
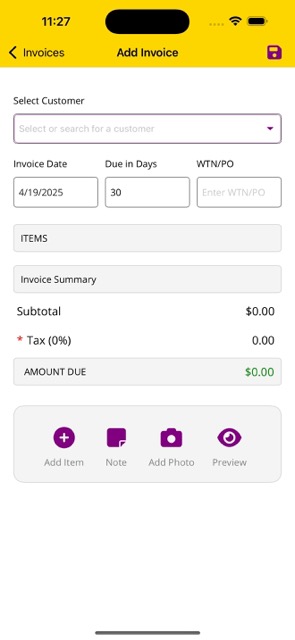
Create Invoice
To create a new invoice, begin by selecting the customer from your contact list.
Then fill in the Invoice Date, the number of days until the due date (this will automatically calculate the due date), and optionally add a WTN/PO number if required by your workflow.
Below that, you'll see the Subtotal, applicable Tax, and the final Amount Due — all of which update automatically based on your invoice content.
The purple action buttons at the bottom (Add Item, Note, Add Photo, Preview) will be explained in the next slides.
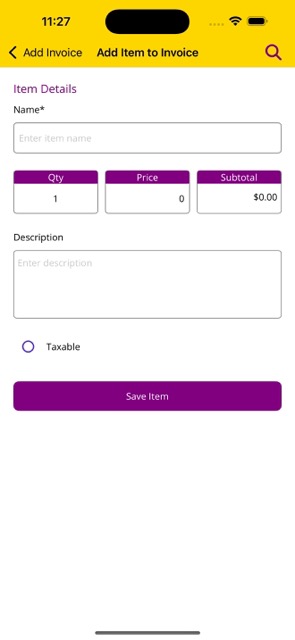
Add Item
After tapping Add Item, you'll be taken to this screen. Here, enter the name of the item or service being billed.
Then, adjust the Quantity and Price. The Subtotal will calculate automatically based on these two values.
You can also provide a Description for the item, which will appear on the invoice.
If the item is subject to tax, enable the Taxable option. Once done, tap Save Item to add it to your invoice.
In the top-right corner, there's a magnifying glass icon 🔍 that lets you access items previously created in the Items section of the menu.
This shortcut helps you quickly reuse frequently used items without retyping them every time you create an invoice.

Search and Autofill Items
To speed up invoice creation, you can tap the magnifying glass icon located at the top right of the “Add Item to Invoice” screen. This opens a searchable list of your previously saved items from the Items section in the main menu.
When you select an item from the list, its name, description, and price are automatically filled in the invoice form. This feature is especially useful for services or products you frequently bill for.
Edit or Delete Item
When you tap on an item you've added to your invoice, a menu will appear with three options:
🖋️ Edit: Opens the same screen used for adding items, allowing you to modify the name, quantity, price, description, or tax settings of that item.
🗑️ Delete: Removes the item from your invoice entirely.
This ensures flexibility and makes it easy to make corrections or updates before sending the invoice to your client.

Add Note
This section allows you to add a note to your invoice. The note will appear at the bottom of the invoice, just before the Terms and Conditions.
Notes are useful for including custom messages, delivery instructions, thank-you texts, or any other information you want the client to see clearly when receiving the invoice.
Once written, don’t forget to tap the purple floppy disk icon in the top right corner to save your note.
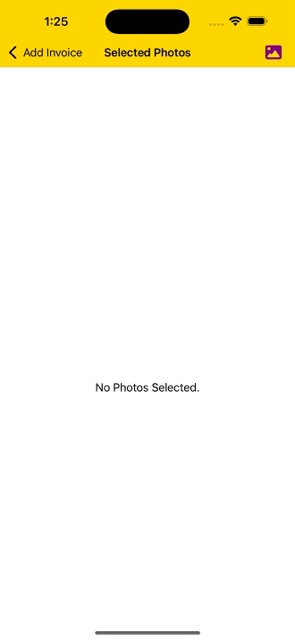
Add Photos
You can attach up to 10 photos to each invoice.
To start adding photos, tap the purple picture icon located in the top-right corner of the screen.
The selected images will automatically appear in a horizontal carousel on this same page. There is no need to save manually — all changes are saved instantly.
To return to the invoice screen, simply tap the back button at the top left.
If you wish to add more photos or remove existing ones, just tap the picture icon again from the invoice editor. It will reopen this screen with all the previously added images ready to manage.
Preview Invoice
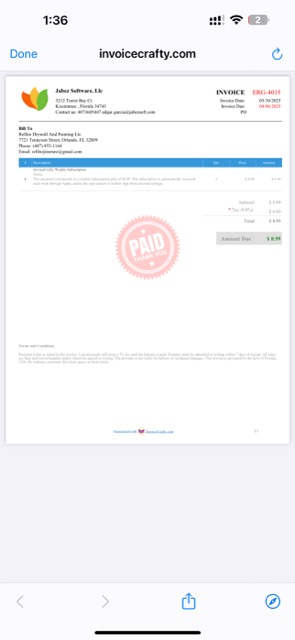
After adding your items, notes, and any photos, you can tap the Preview button to view a PDF version of your invoice.
The preview will include your logo, company details, client information, invoice date, due date, item list, notes, and terms & conditions.
If the invoice is already marked as Paid, a red PAID watermark will appear in the center of the document.
You can zoom, scroll, or share the invoice directly from this screen.

Open Invoice Actions
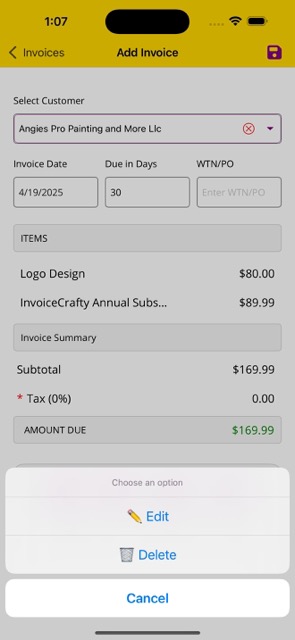
To view an invoice, start by tapping any invoice in the list. A menu will pop up with several actions you can take.
Tap on 👁️ View to open the full invoice details screen. This is helpful for quickly checking what was billed, the customer info, and any payment data associated with that invoice.
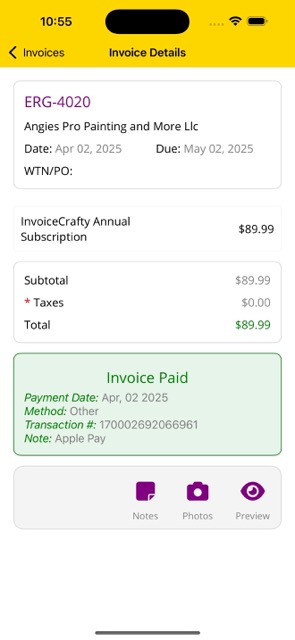
View Invoice
This screen shows a summary of the selected invoice, including the invoice number, client, issue and due date, item list, subtotal, tax, and total amount.
If the invoice has already been paid, a green box will display the Payment Date, Payment Method, Transaction ID, and any additional notes provided by the payment processor.
You can tap any item in the invoice to view its details, such as name, quantity, price, description, and whether it's taxable.
At the bottom of the screen, you’ll find quick access buttons to view or update the invoice’s Notes, attached Photos, or open the PDF Preview.

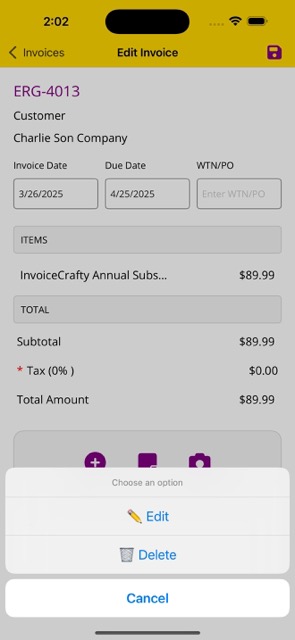
Edit Invoice From Menu
To edit an existing invoice, simply tap the invoice you wish to update from the list. A menu will appear showing several options.
Tap on ✏️ Edit to open the invoice editor screen and begin modifying the invoice details, such as dates, items, or attachments.
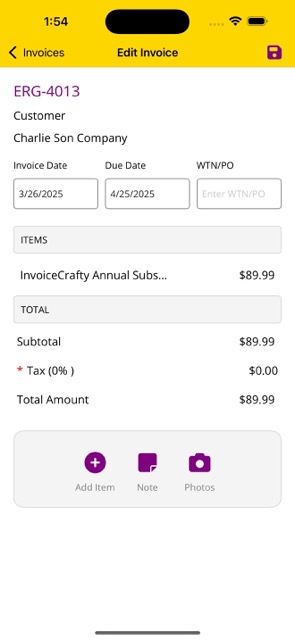
Edit Invoice
This screen allows you to make changes to an existing invoice — such as invoice date, due date, WTN/PO number, item list, notes, and photos.
⚠️ Important: The customer cannot be changed after the invoice has been created.
You can use the buttons at the bottom to add new items, update the note, or attach more photos.
Once you finish editing, tap the purple floppy disk icon at the top-right corner to save your changes.
Edit or Delete Item
When you're editing an invoice, you can tap any item already added to the invoice to open a small options menu.
This menu gives you the choice to either:
🖋️ Edit: Opens the item editor screen with the existing name, quantity, description and price pre-filled, so you can make changes quickly.
🗑️ Delete: Instantly removes the item from the invoice.
This feature ensures flexibility and helps you correct any item in the invoice without needing to remove the entire document.
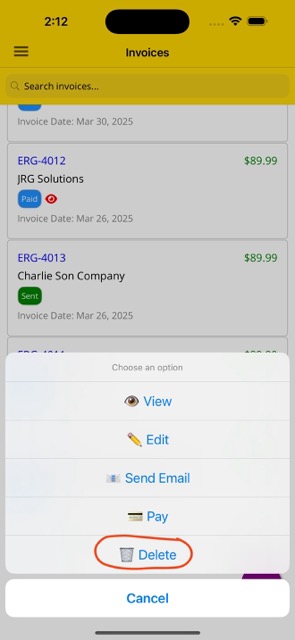
Delete Invoice
When you tap on an existing invoice from the list, a menu will appear with various options such as View, Edit, Send Email, Pay, or Delete.
If you select Delete, a confirmation window will pop up asking if you're sure you want to permanently remove the invoice.
This action cannot be undone. Once confirmed, the invoice will be deleted immediately from your records.
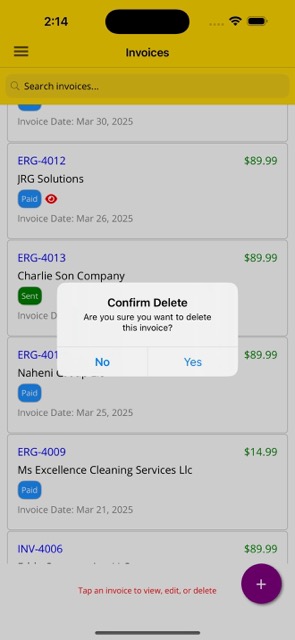
Confirm Deletion
After selecting the Delete option from the menu, a confirmation dialog will appear asking:
"Are you sure you want to delete this invoice?"
You must confirm by tapping Yes to proceed, or No to cancel the action.
🛑 This action is irreversible. Once deleted, the invoice will be removed from your records permanently.
⚠️ Note: If the invoice is marked as Paid, it cannot be deleted until the payment is removed.
To do this, tap the green Paid box in the invoice details — a new menu will appear allowing you to Delete Payment. Once the payment is removed, the invoice can be deleted.

Send Invoice via Email
From the list of invoices, tap any invoice to open the action menu. Then select 📧 Send Email from the list of options.
This will open a screen where you can review or edit the email subject and message before sending. The invoice will be automatically attached as a PDF file and sent to the customer’s email on file.
Once you're ready, tap the Send button in the top right corner to send the invoice.
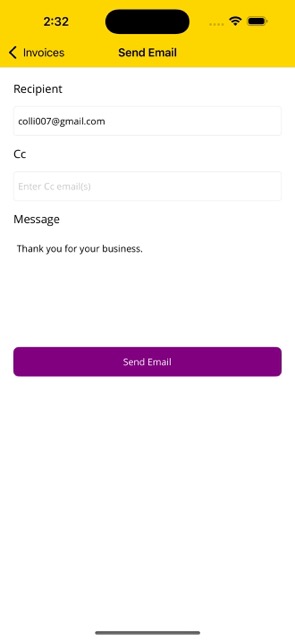
Customize Email
This is the screen where you can customize the email that will be sent with your invoice attached as a PDF.
The Recipient field is pre-filled with the client’s email address. You can also add CC emails if needed, separating multiple entries with commas.
The Message field lets you write a personalized note. A default message is provided, but you may modify it freely before tapping Send Email at the bottom.
📎 The email will include your logo, company details, and invoice PDF attachment — making it look clean and professional.

Pay Invoice
From the list of invoices, tap one to open the action menu and choose 💳 Pay.
This opens the payment screen where you can register or edit a payment made by the client. The screen shows the invoice number, client, date, and amount due.

Edit Payment
If the invoice has already been marked as paid, the screen will show the payment details including method, transaction ID, date, and notes.
You can update the information or tap the red Delete button to remove the payment — which will change the invoice status back to unpaid.
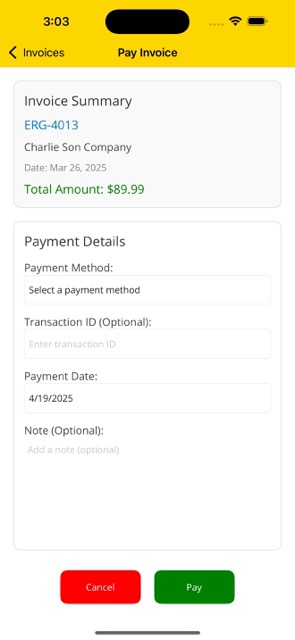
Register Payment
When an invoice is still marked as unpaid, you can enter new payment details including method, transaction ID (optional), date, and note.
Tap Pay to save the payment and mark the invoice as paid. If you change your mind, use the Cancel button to exit without saving.
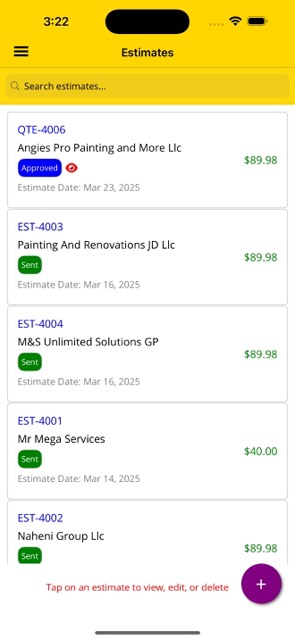
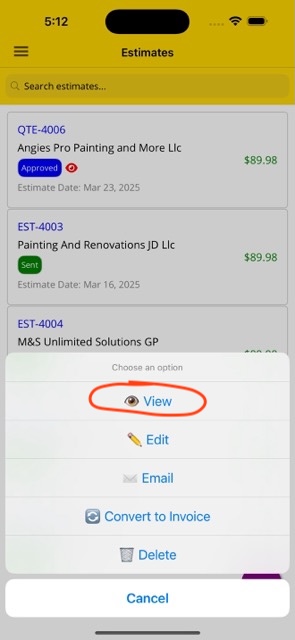
Estimates
This section shows a list of all estimates created in the app. Each estimate card displays the estimate number, client name, status, estimate date, and total amount.
The badge on each estimate can show statuses such as:
Sent = Sent to the client
Approved = Client has accepted the estimate
Draft = Not yet finalized
A red eye icon indicates that the client has viewed the estimate. Tap on any estimate to open the menu and choose actions like View, Edit, Send Email, Delete, or Convert to Invoice.
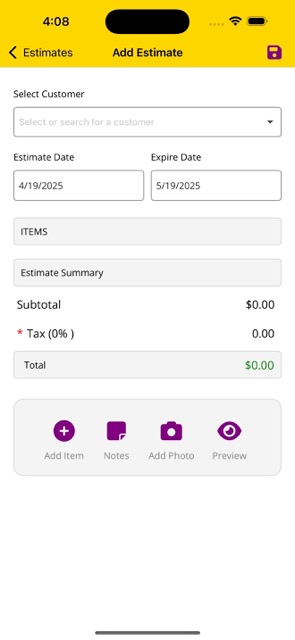
Create Estimate
To create a new estimate, begin by selecting the customer from your contact list.
Then fill in the Estimate Date and the Expiration Date that defines how long the estimate is valid.
Below that, you'll see the Subtotal, applicable Tax, and the final Total Estimate — all of which update automatically based on your estimate content.
The purple action buttons at the bottom (Add Item, Note, Add Photo, Preview) will be explained in the next slides.
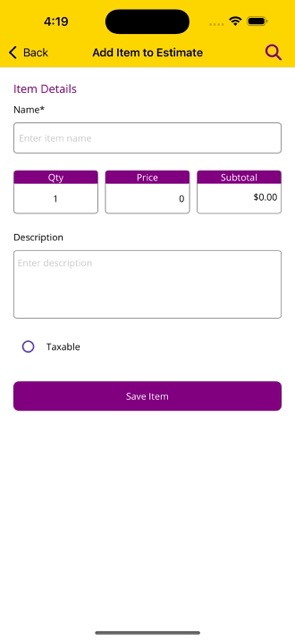
Add Item
After tapping Add Item, you'll be taken to this screen. Here, enter the name of the item or service you want to quote.
Then, adjust the Quantity and Price. The Subtotal will update automatically based on those values.
You can also provide a Description for the item, and enable the Taxable option if it applies.
Once you're done, tap Save Item to add it to the estimate.
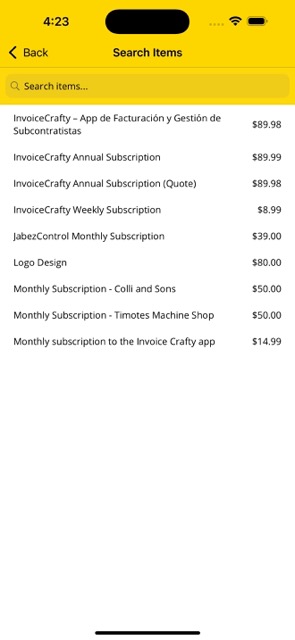
Search and Autofill Items
To save time while building your estimate, tap the magnifying glass icon located in the top right of the “Add Item” screen.
This opens a searchable list of previously created items from your Items section in the menu.
When you select an item, the Name, Description, and Price fields will be filled in automatically — making the process faster and more accurate.
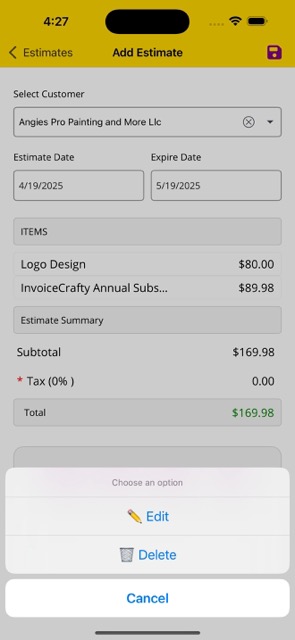
Edit or Delete Item
When you tap on an item you've added to your estimate, a menu will appear with three options:
🖋️ Edit: Opens the same screen used for adding items, allowing you to modify the name, quantity, price, description, or tax settings of that item.
🗑️ Delete: Removes the item from your estimate entirely.
This ensures flexibility and makes it easy to make corrections or updates before sending the estimate to your client.
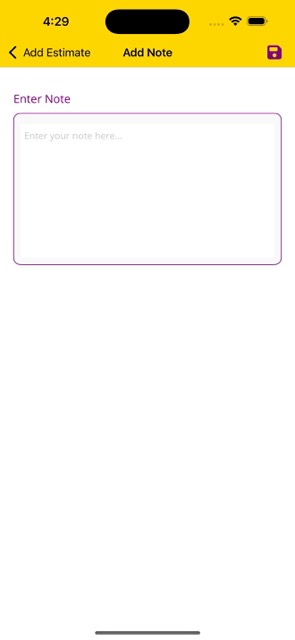
Add Note
This section allows you to add a note to your estimate. The note will appear at the bottom of the document, just before the Terms and Conditions.
Notes are useful for including custom messages, delivery instructions, thank-you texts, or any other information you want the client to see clearly when reviewing the estimate.
Once written, don’t forget to tap the purple floppy disk icon in the top right corner to save your note.
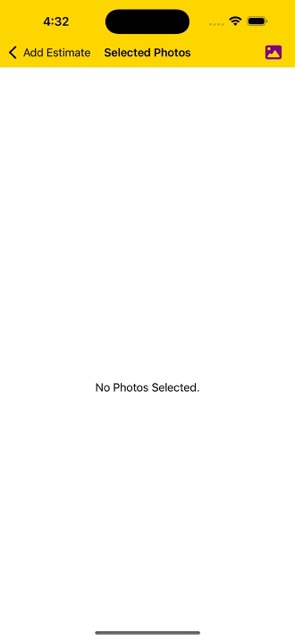
Add Photos
You can attach up to 10 photos to each estimate.
To start adding photos, tap the purple picture icon located in the top-right corner of the screen.
The selected images will automatically appear in a horizontal carousel on this same page. There is no need to save manually — all changes are saved instantly.
To return to the estimate screen, simply tap the back button at the top left.
If you wish to add more photos or remove existing ones, just tap the picture icon again from the estimate editor. It will reopen this screen with all the previously added images ready to manage.
Preview Estimate
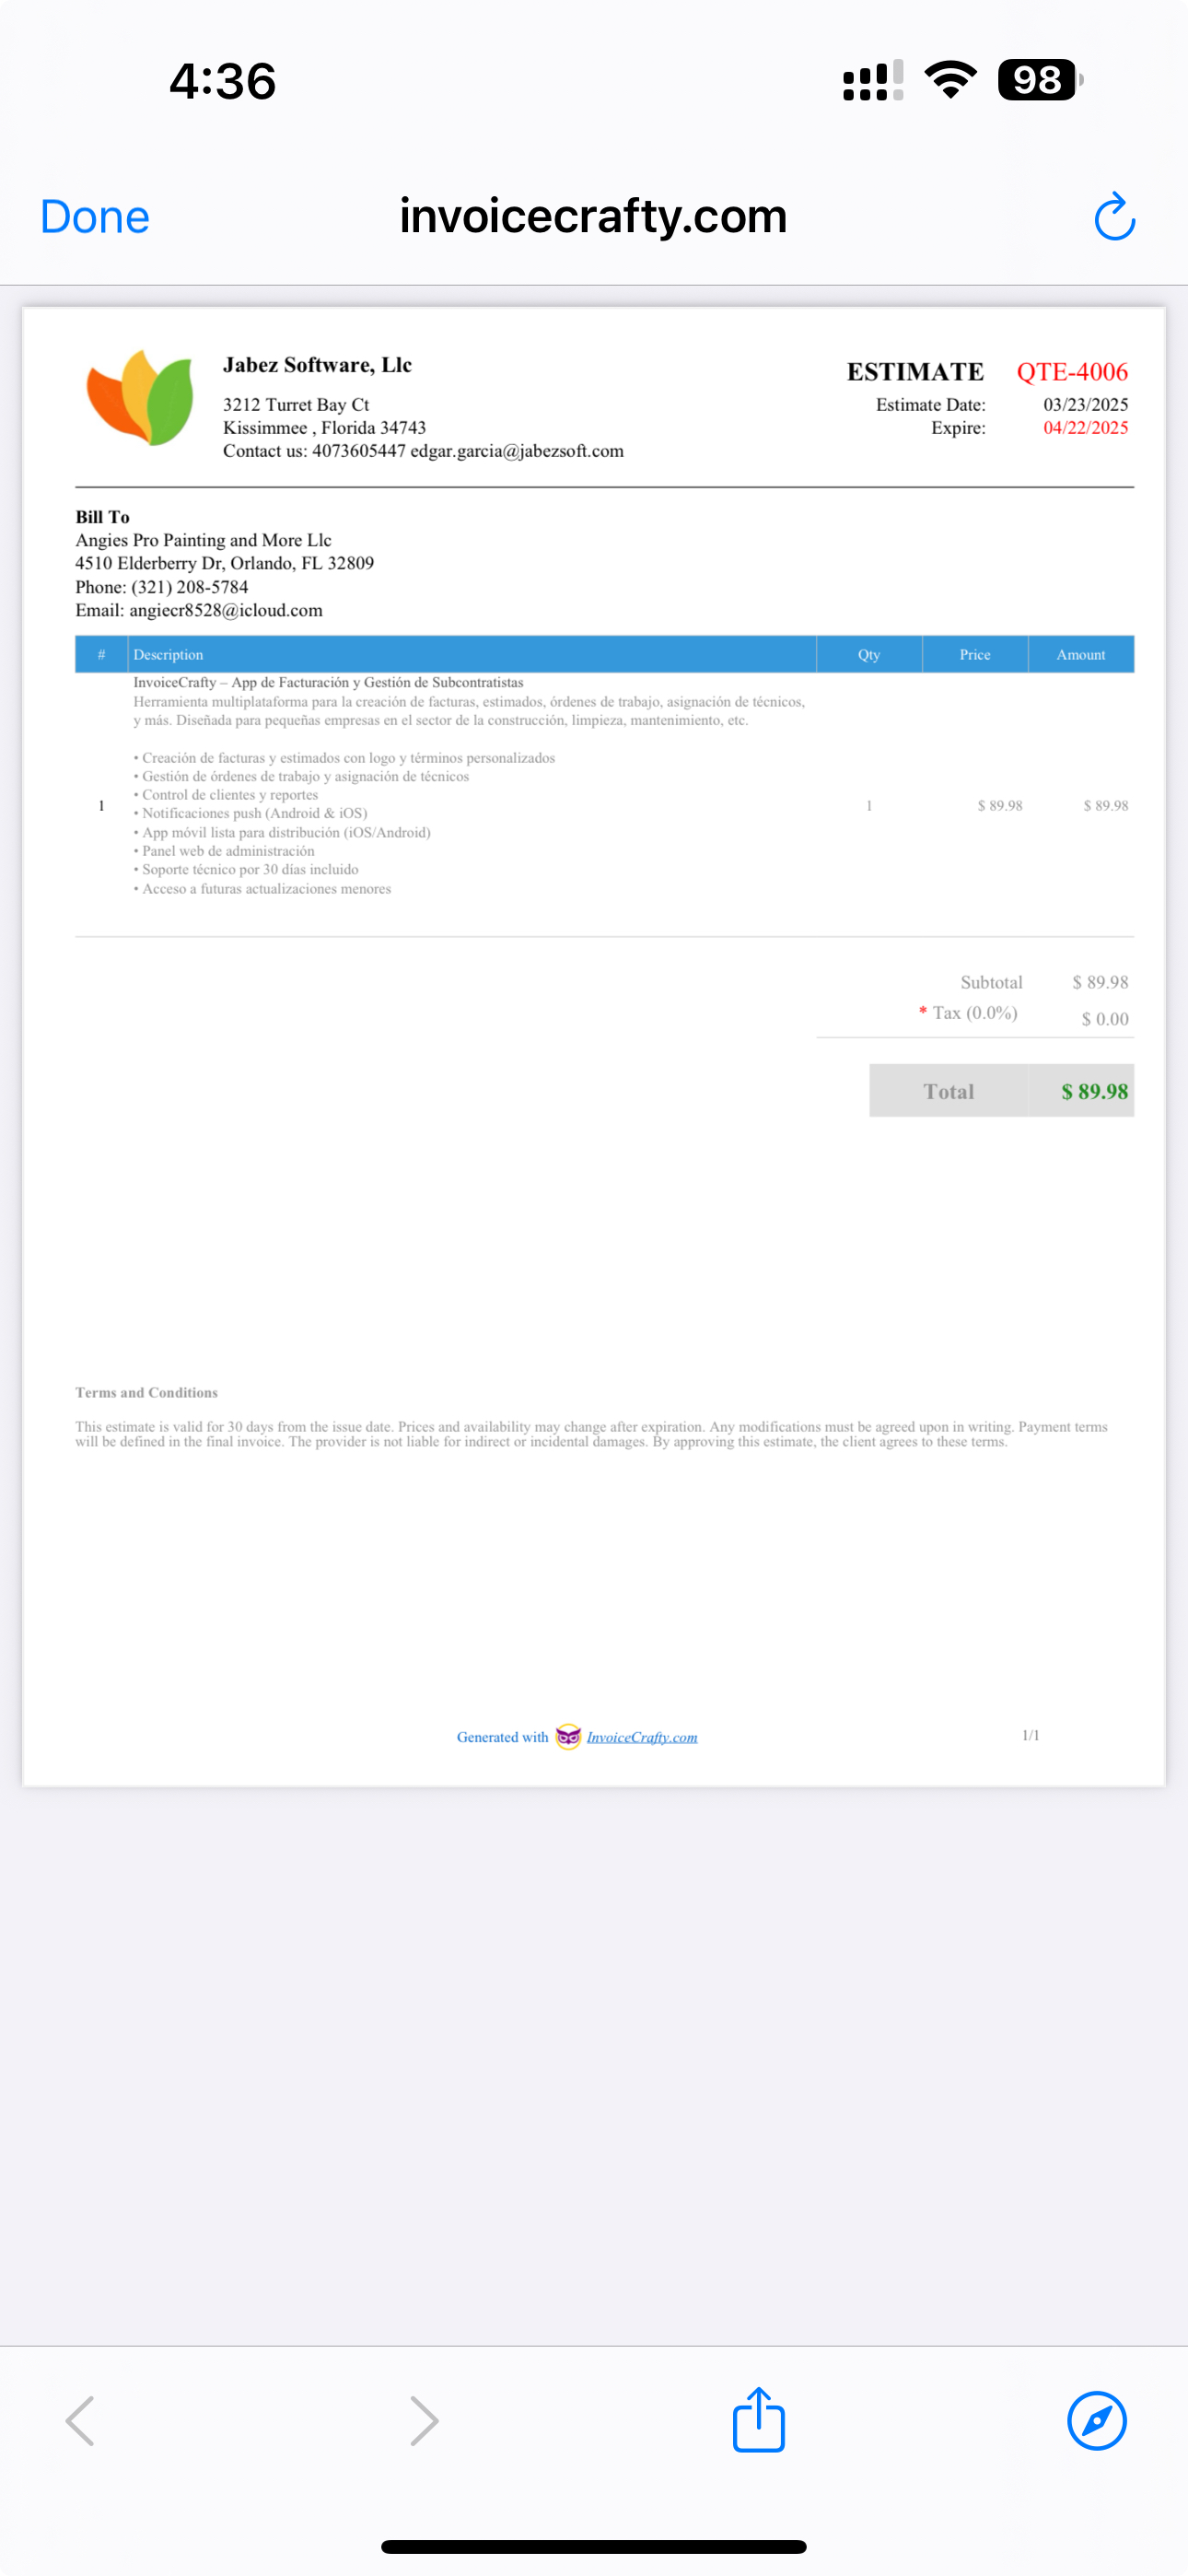
After adding items, notes, and any photos, you can tap the Preview button to view a PDF version of your estimate.
The preview includes your logo, business details, customer info, date, expiration, item list, total, and any notes you've entered.
You can zoom, scroll, or even share the PDF directly from this screen to get customer approval before converting it into an invoice.
View Estimate
This screen shows a complete summary of the estimate, including the estimate number, client information, date, expiration, items, subtotal, tax, and total amount.
If you've added notes or photos to the estimate, you'll find quick access buttons at the bottom of the screen to view or edit them.
You can tap on any item to see its full details (name, quantity, price, description, and tax status). At the top-right, there are buttons to edit or convert to invoice when the client is ready to proceed.
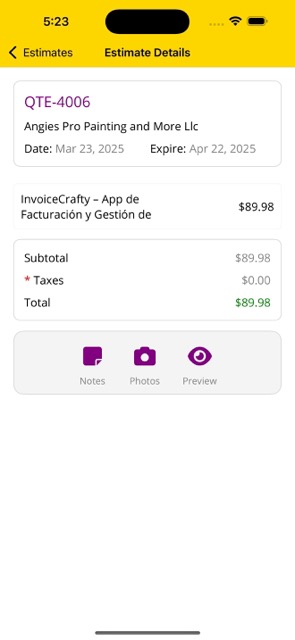
Estimate
The Estimate Details screen shows a clean breakdown of the subtotal, taxes, and total amount. All calculations are automatically generated based on the items you added.
Below the totals, you’ll find five purple action buttons: Notes, Photos, Preview.
Each button lets you access or modify its respective content. You can preview the PDF, send it by email, or convert the estimate into an invoice when the client agrees to the proposal.

Edit an Estimate
To edit an existing estimate, go to the main Estimates tab and tap on the one you want to modify.
A menu will appear with several options: View, Edit, Email, Convert to Invoice, and Delete.
Tap on ✏️ Edit to open the editable version of the estimate with all previously entered information preloaded.
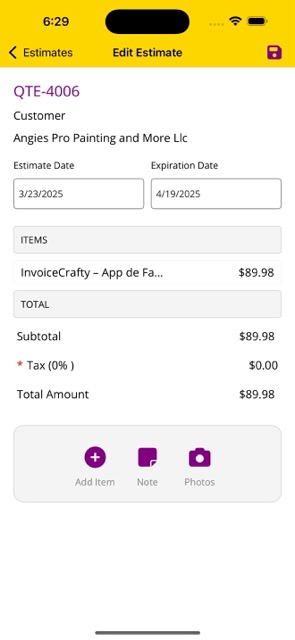
Edit Estimate
When you tap on 'Edit' for any estimate, you’ll return to the same form used for creating one, but with all data pre-filled.
You can modify the client, dates, terms, item list, notes, and attached photos. After updating the content, just press the floppy disk icon at the top to save your changes.
If needed, you can preview or email the revised estimate again.
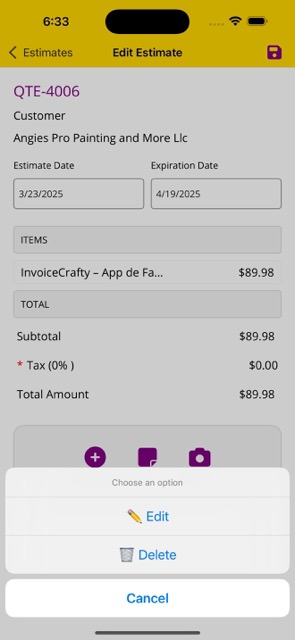
Modify Items
While editing an estimate, you can tap on any existing item to open a contextual menu with options to Edit or Delete the item.
Selecting ✏️ Edit will reopen the item form with all its values pre-filled so you can make changes.
Selecting 🗑️ Delete will remove the item from the estimate.
This allows you to easily keep your quote accurate before saving and sending it again.

Delete Estimate
If you need to remove an estimate, tap on it and select 🗑️ Delete from the action menu.
A confirmation alert will appear to ensure you don’t delete anything by mistake.
Once confirmed, the estimate will be permanently deleted from the app and cannot be recovered — so proceed with caution!

Confirm Deletion
After choosing 🗑️ Delete, a confirmation dialog will appear asking if you’re sure you want to delete the estimate.
Tap Yes to proceed, or No to cancel the action.
This step prevents accidental deletions and ensures that only intentional removals are made.

Send by Email
After selecting ✉️ Email from the estimate menu, you'll be taken to a screen where the client's email is pre-filled, along with the total amount and status.
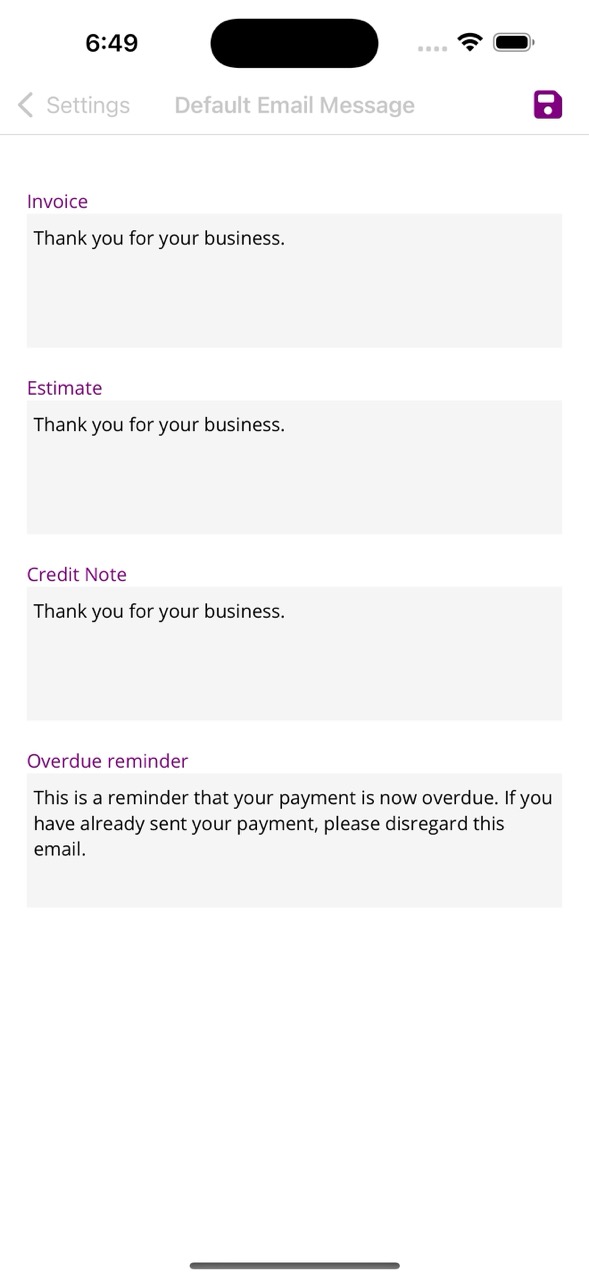
You can enter a custom message or use your default template from Settings. Once ready, tap Send to deliver the estimate PDF to the client’s inbox.
This makes sharing quotes fast and professional, directly from your device.
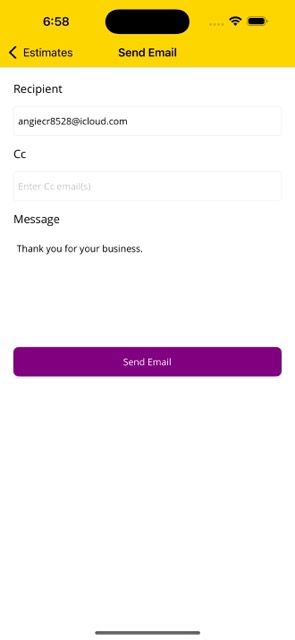
Fill Out Email
In the email form, the Recipient field is pre-filled with the client’s email address. You can also add additional addresses in the Cc field.
The Message box lets you include a personalized note or use your default email template from Settings.
Once everything looks good, simply tap the purple Send Email button to deliver the estimate PDF directly to your client’s inbox.
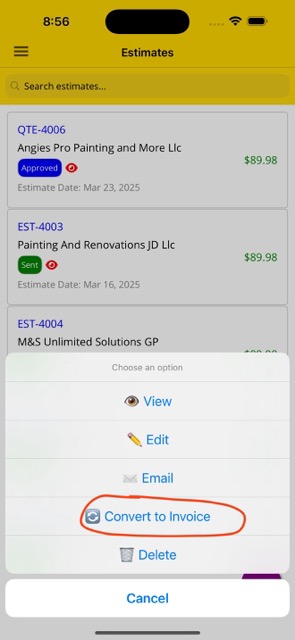
Convert to Invoice
When a client accepts your estimate, you can easily convert it into an invoice.
Tap on the estimate, and from the options menu select 🔄 Convert to Invoice.
A confirmation dialog will appear. If accepted, the app will automatically generate an invoice with all data copied from the estimate, including items, notes, and customer information.
The newly created invoice will then appear in the Invoices tab, ready to be previewed, emailed, or paid.
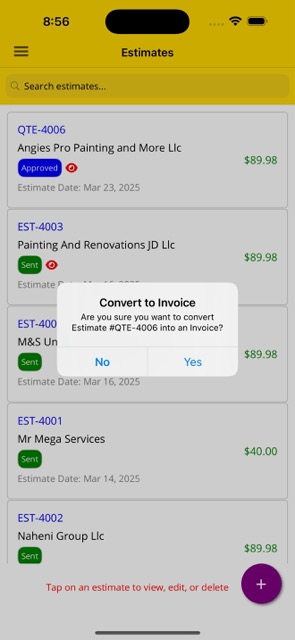
Confirm Conversion
Once you select 🔄 Convert to Invoice, a confirmation alert will appear asking if you’re sure you want to proceed.
Tap Yes to create the invoice. The estimate’s data will be copied and saved as a new invoice in your Invoices tab.
This feature helps you avoid retyping any details, making the process faster and error-free.
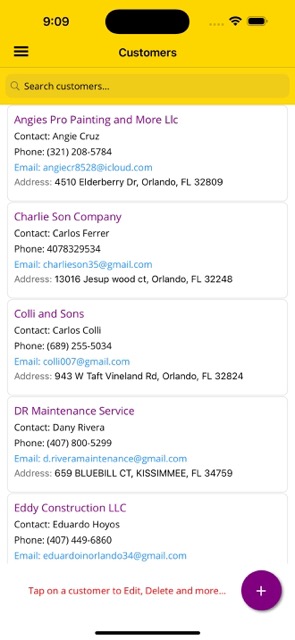
Customers
This tab shows a list of all customers saved in the app. Each customer card displays their name, contact person, phone number, email, and address.
You can search for any customer using the search bar at the top.
To edit, delete, or view more actions for a customer, simply tap on their card. A menu will appear with the available options.
To add a new customer, tap the purple “+” button at the bottom-right corner of the screen.
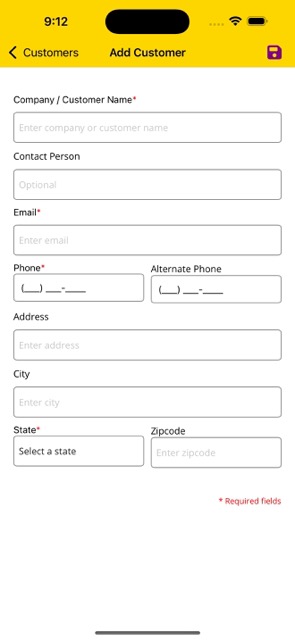
Add Customer
Fill out the form to register a new customer or company in your database.
Required fields include: Company/Customer Name, Email, Phone, and State.
Optionally, you can include a Contact Person, alternate phone, and full address details.
Don’t forget to tap the purple floppy disk icon at the top right corner to save the new customer.
Edit Customer
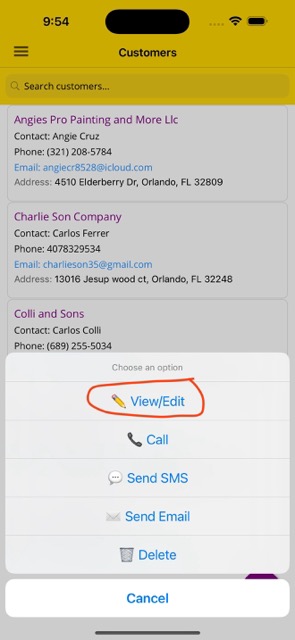
When you tap on a customer from the list, a menu will appear with several options. Tap ✏️ View/Edit to open the full customer form with all details pre-filled.
You’ll be able to update any of the customer’s information, including their contact name, phone numbers, email, and address.
After making your changes, don’t forget to tap the purple floppy disk icon at the top to save your updates.

Update Customer Info
On this screen, all customer data appears pre-filled — including company name, contact person, email, phone numbers, and address.
You can freely update any information and ensure everything is correct.
When done, tap the purple floppy disk icon at the top to save your changes.
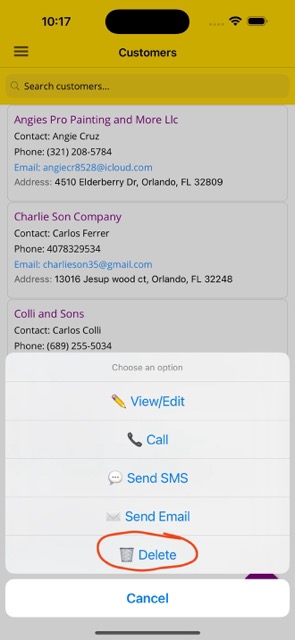
Delete Customer
To delete a customer, tap on their card from the list. In the menu that appears, select 🗑️ Delete.
This will prompt a confirmation dialog to prevent accidental deletions.
Once confirmed, the customer record will be removed from your database and cannot be recovered.
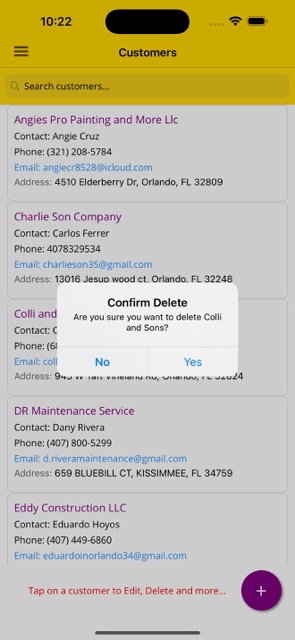
Confirm Deletion
After choosing 🗑️ Delete, a confirmation alert will appear asking you to confirm your decision.
Tap Yes to proceed with deleting the customer, or No to cancel and return to the list.
This extra step is designed to help avoid accidental deletions and ensure you're making an intentional action.
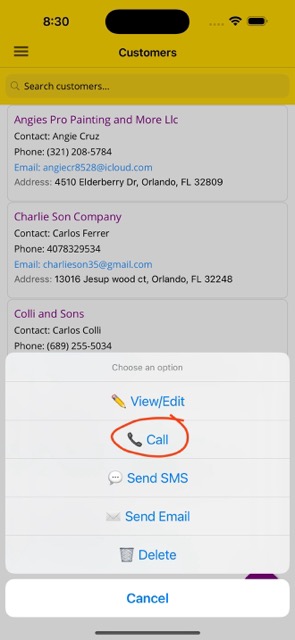
Call Customer
From the Customers section, tap on any customer’s card to bring up the options menu. Select 📞 Call to start a phone call to the number registered for that client.
This action will open your device’s default phone dialer app and automatically input the customer’s phone number. It’s a fast and convenient way to connect directly without needing to copy or retype their contact details.
This feature only works if the device has call capabilities and the number is in a valid format.
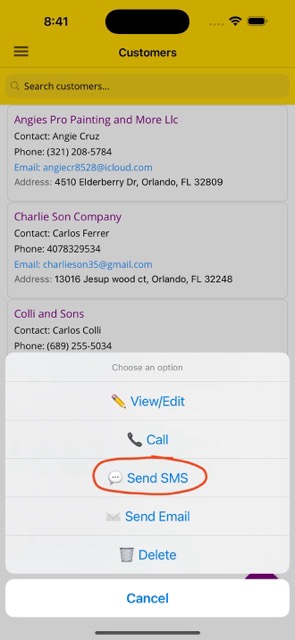
Send SMS
From the Customers section, tap any client card to open the options menu. Then select 💬 Send SMS to open your device’s text messaging app with the customer’s phone number pre-filled.
This makes it quick to send a text for reminders, updates, or any communication you need without switching apps.
Make sure your device supports SMS and has an active messaging plan.
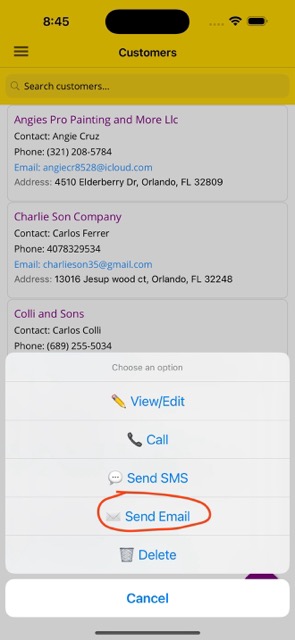
Send Email
In the Customers section, tap on a customer to open the options menu. Then select ✉️ Send Email to launch your device’s email app with the client’s email address pre-filled.
This shortcut makes it simple to send professional messages, proposals, invoices, or any business-related communication directly from the app.
If you have multiple email apps installed, your device will let you choose which one to use.
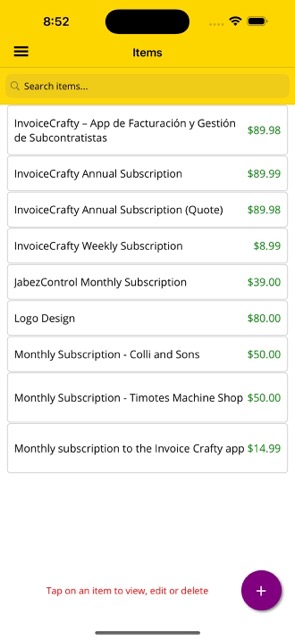
Items
This section shows a list of all your saved items or services available for invoices and estimates.
Each card displays the item name and its price.
To view, edit, or delete an item, simply tap on it and choose the action from the menu.
To add a new item, tap the purple “+” button at the bottom right of the screen.
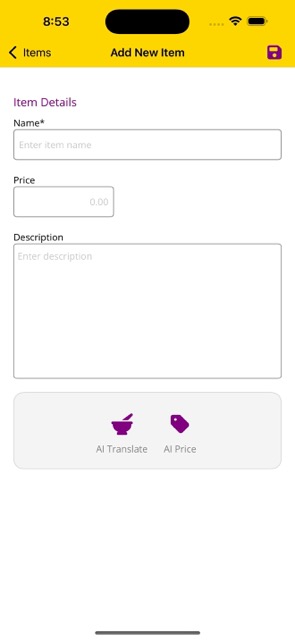
Add New Item
Fill out the form to create a new product or service. Required fields include: Name and Price. You may also enter a Description.
At the bottom of the screen, you’ll find two special tools:
🧠 AI Translate – Instantly translates your description into perfect English.
💲 AI Price – Analyzes your item and suggests Budget, Regular, and Premium pricing based on cost, materials, and profit margin. (Available to premium users only.)
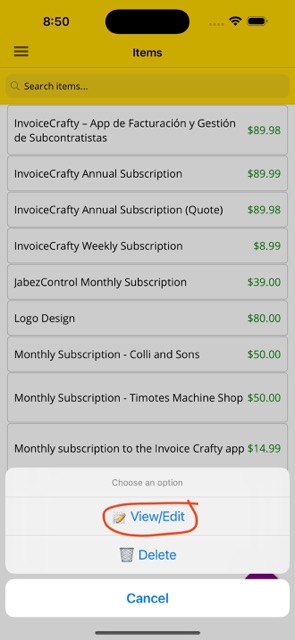
Select View/Edit
From the Items list, tap on any item to open the action menu. Then select 📝 View/Edit to view or modify the item’s details.
This is useful when you want to make quick adjustments without needing to recreate the item from scratch.
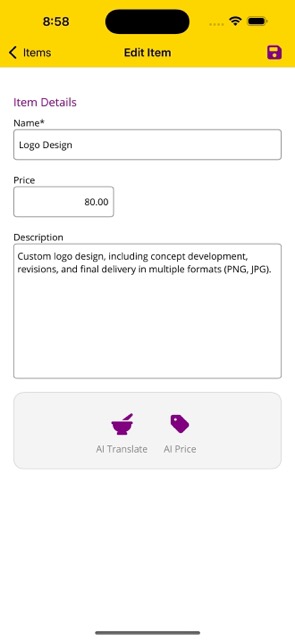
Edit Item
The form will appear with all fields pre-filled: Name, Price, and Description.
You can update any value, and use the AI Translate or AI Price tools if needed.
Tap the purple floppy disk icon at the top-right to save your changes.
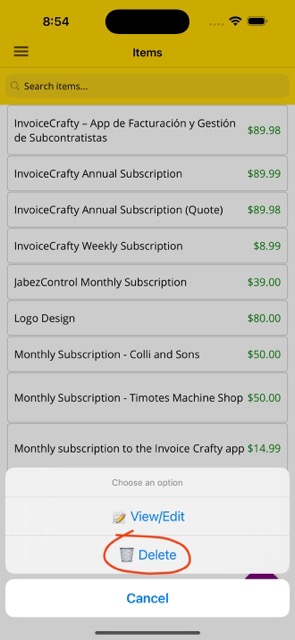
Delete Item
To delete an item, tap on it from the list and select 🗑️ Delete from the menu.
This is useful when you no longer need the item or want to clean up your product database.
Make sure to confirm your choice on the next screen.
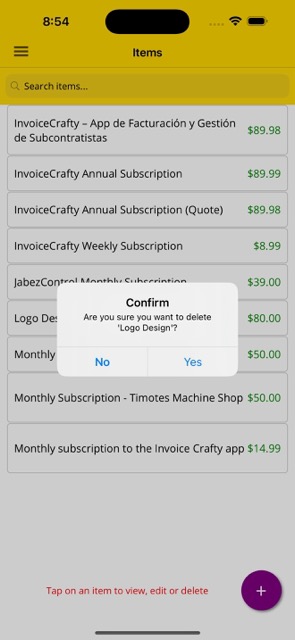
Confirm Deletion
A confirmation dialog will appear asking if you are sure you want to delete the item.
Tap Yes to proceed, or No to cancel the deletion.
Once deleted, the item cannot be recovered.